
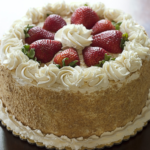
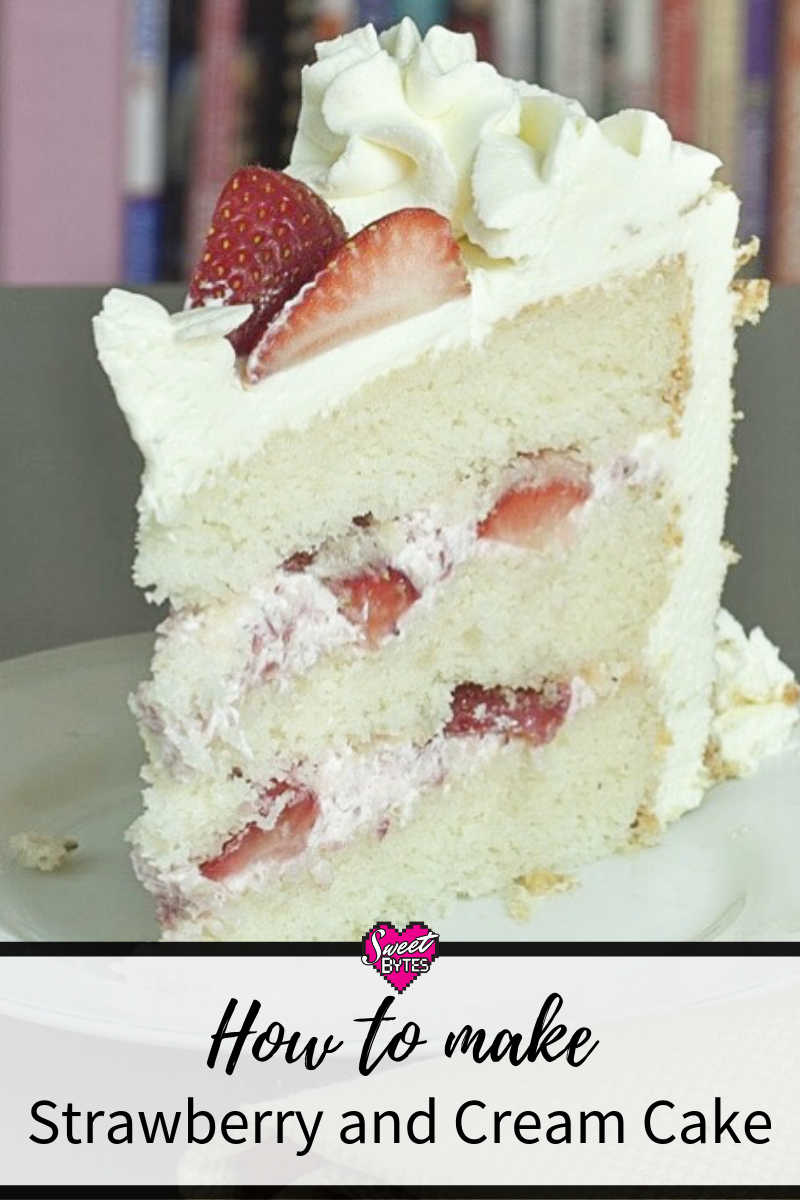
This is the cake that everyone will remember. Fresh strawberries, delicate white cake, strawberry and cream filling, and whipped mascarpone frosting all layered in one show-stopping, unforgettable cake. Strawberry and cream cake is amazingly delicious. Serve this cake and you will be loved. The only thing that could make it better is using freshly picked, local strawberries.
Jump to Recipe
Recipe origins
The idea for the cake began with a picture and link to another blogger’s recipe that a client sent me. She wanted me to recreate the cake for her husband’s birthday. Back in those days, I tried everything I could to make my customers happy! Sadly, I can’t attribute the recipe origins because it was years ago when I began making and selling the cake. On my menu it was called “Strawberry Mascarpone Cake.” There are so many other versions and other cakes called Strawberry Mascarpone Cake or Strawberries and Cream Cake that that original source must be buried under a ton of internet! Anyway, back to the cake. It was originally a box cake mix and the instructions for making the filling and frosting caused me to have a nervous breakdown trying to get “Sweet Bytes” results from scratch. Many changes were made… “Many I tell you,” she says, staring off into the abyss. It was worth it though! Here we are today learning how to make this incredible strawberry and cream cake!
An intermediate level cake recipe
I’m not going to lie to you and say this is an easy cake to make. It’s more of an intermediate level cake, but don’t run away! It’s a great cake to try as long as you aren’t rushed or under pressure to make it perfect for a big event the first time you are making it. The cake recipe uses the reverse creaming method for mixing and there is also the use of gelatin as a stabilizer for the frosting and filling. Strawberry and Cream Cake is definitely more challenging than a one-bowl recipe like my chocolate cake or red velvet cake. Read through the recipe a couple of times and make yourself familiar with all of the steps before you dive in. There are a few advanced steps, but definitely no rocket science. You can do it! For my fellow extreme baking enthusiasts, here is an article for further reading about baking cakes from scratch. I recommend it if you are interested in learning about the different levels of difficulty in cake recipes: How to Bake a Cake From Scratch. Up for the challenge? Hooray! Let’s proceed! I will walk you through the tricky parts.
Equipment needed to make strawberry and cream cake as shown in this recipe
- Mixer (stand or hand-held will work)
- Mixing bowls
- Measuring cups and spoons
- Microwave safe mug or cup
- Kitchen scale
- Silicone spatula
- Flour sifter
- 3- 8″ cake pans*
- Strawberry huller or milkshake straw
- Sharp paring knife
- Fine mesh strainer
- Small food processor or hand-held masher
- Offset spatulas
- Piping bag and a Wilton 2-D piping tip- optional
*This cake recipe can also make 2- 9″ or 4- 6″ round layers, or 1 -9 x 13″ sheet cake. It can also be made into cupcakes, but I don’t know the precise amount of cupcakes the recipe will make, I’m estimating 18.
Ingredients needed to make a strawberry and cream cake
- Cake flour
- Sugar
- Baking powder
- Salt
- Unsalted butter
- Whole milk
- Egg whites
- Vanilla extract
- Almond extract
- Strawberries
- Heavy whipping cream
- Mascarpone
- Powdered sugar
- Powdered gelatin
- Graham cracker crumbs
Tips and tricks for making the strawberry and cream cake
I usually make the cake over the course of 2 days to break up the time. Depending on your skill, it could be done in a couple of hours. Rushing a beautiful cake is risky, I like to have plenty of time. Day 1: Bake and cool the cake layers. (Read How to Store Baked Cake Layers to see how I keep the layers moist and fresh overnight.) Day 2: Fill, decorate, and serve the cake. If you need to serve the cake on day 3, it will hold up and still taste fresh. The fresh strawberries that garnish the top of the cake might be the only issue you have with freshness. Its best to place those right before serving so they look fresh and appetizing.
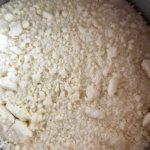
The reverse creaming method for making the cake

For a great cake texture and good crumb, the reverse creaming method is an excellent technique. The butter is mixed into the dry ingredients until is resembles coarse crumbs before adding any of the wet ingredients. If done properly it will resemble the photo below. Those larger clumps are not whole butter. They are where the ingredients have stuck together, but will easily break apart when touched.
Getting the most out of your strawberries

You’ll need a total of 2 pounds of fresh strawberries to finish the cake and have enough for garnish. If you have to buy quarts of strawberries, get 2 quarts and you will have a few leftover strawberries. Set aside at least 9 strawberries for the garnish. These should be the prettiest and similar in size. Hull the rest of the strawberries using a drinking straw. It’s important to get that white core out of the center just to avoid the texture and white appearance.
I get commissions for purchases made through links in this post.
You can also buy a nifty tool to make the job of strawberry hulling easier and a lot prettier. This tool would be great for making beautiful filled strawberries!
Set aside the mushy and imperfect strawberries to make the crushed strawberries for the filling. One more thing, always taste the strawberries you bought to see how sweet they are. Strawberries vary greatly in their sweetness and you might need to add a tablespoon or two of sugar to your crushed strawberries before you strain them. That will make them a little sweeter and cause them to produce a little more juice. You know best the sweetness level you prefer.
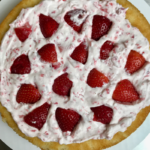
Stacking and filling the strawberry and cream cake
Now on to my favorite part of making the cake: decorating! This is a real beauty when it’s finished. Even if you aren’t very confident in your skills, dollops of whipped frosting and fresh berries can transform any cake into a stunner!

I always level my cake layers before stacking them. I don’t have a fancy cake leveler, just a simple, inexpensive one that I picked up during my Wilton Method Instructor days. It has worked for all of my classes and actual cakes, including wedding cakes, for 4 years and it still works great. I also have a cake knife that I love and have used for years before I got the leveler. (<—Amazon link)
After I level the cakes, I brush simple syrup on top of the exposed cake. but not too much. I don’t want soggy cake, just a little added moisture. I just use a 1″ pastry brush to do this. In order to keep the strawberries and whipped cream from oozing out into the mascarpone frosting, leave about a 1/2 inch around the edge of the cake layer and place quartered strawberries evenly around the filling for extra support. After placing the next cake layer, give a gentle downward push to make a good connection between the cake layers and the filling. Keyword “GENTLE.”
Frosting the cake

For this cake, I do a crumb coat with an offset spatula, making sure to press the frosting into any gaps between the layers. I cover the entire cake with a thin layer of frosting and then let it rest in the refrigerator for 30 minutes. Although the frosting doesn’t harden like buttercream, it’s still a little firmer after some time in the refrigerator and the cake layers settle together. Next, add a thick layer of the whipped mascarpone frosting and make the sides smooth using a scraper. My favorite smoother is actually a sewing tool called a Dritz Ezy Hem (find on Amazon). It’s extremely lightweight and does a better job than the (many) cake tools I’ve bought!
I also love the addition of graham cracker crumbs on the sides. It’s a tiny bit of extra effort, but they look nice, hide flaws, and add a great texture and flavor to the sides of the cake.
Finishing the cake

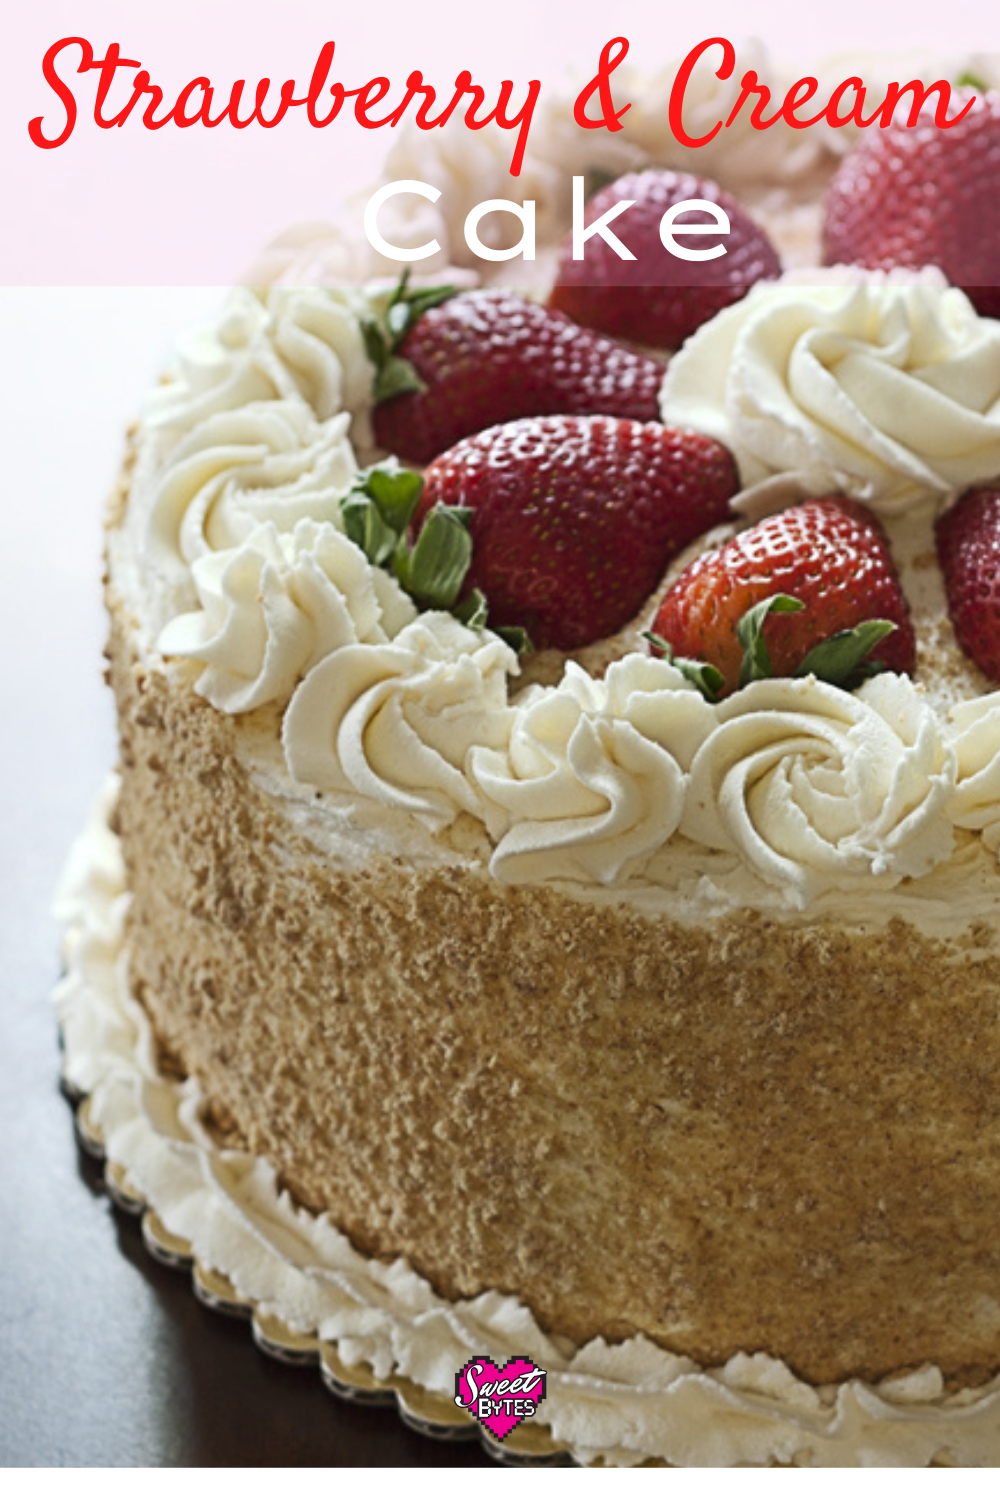
The finishing touches are what really make this cake special. I use a Wilton 2D piping tip and pipe a rosette crown around the top of the cake and a simple border around the base of the cake.
In case you aren’t familiar with piping them, this video demonstrates just how easy it is to pipe rosettes: When you have your piped rosette crown around the edge of the cake, halve the whole strawberries that you set aside and place them around the cake. Sometimes I put a whole one in the center and place some more strawberries around the bottom of the cake.
Transporting the cake
The whipped cream and strawberry cake filling is made stable with the use of gelatin. Yet, it will not harden in the refrigerator like buttercream or ganache will. This can cause some sliding when transporting the cake. If you are going to transport the cake, a few skewers stuck through the entire cake might help you feel safer. You can pull them out when you get to your location or just warn guests that they are in there if you conceal them with frosting. (Full disclosure: I’ve never needed to do this and the cake has never slid on me, but insurance is better than stressing out! )
Strawberry and Cream Cake
This cake is perfect for when you want a showstopping dessert that still feels light and sweet. A white vanilla almond cake, strawberry and cream filling, and mascarpone whipped cream frosting that will wow your guests.
Ingredients
White Cake
- 2 1/4 cups sifted cake flour 9 ounces
- 1 3/4 cup granulated sugar 12.25 ounces
- 4 teaspoons baking powder
- 1 teaspoon salt
- 12 Tablespoons unsalted butter, softened 6 ounces
- 3/4 cup egg whites, room temperature 6 large
- 1 cup whole milk, room temperature
- 2 teaspoons pure vanilla extract
- 1 teaspoon pure almond extract
Strawberries and Whipped Cream Filling
- 1 cup hulled, mashed strawberries, with liquid strained out add granulated 1-2 Tablespoons of sugar to taste
- 1 cup heavy whipping cream
- 1/4 cup powdered sugar
- 1 teaspoon unflavored powdered gelatin
Mascarpone Whipped Cream Frosting
- 3 cups heavy whipping cream
- 16 ounces mascarpone cheese, softened
- 1 1/2 cups powdered sugar
- 2 teaspoons pure vanilla extract
- 2 teaspoons unflavored powdered gelatin
Constructing the Cake
- hulled strawberry slices, quartered lengthwise, as needed
- graham cracker crumbs
- 6 strawberries, halved
- 5 whole strawberries
Instructions
Make the cake
-
Pre-heat the oven to 350°F, place rack in lower 1/3 of the oven. If you don’t have room for all 3 pans, you can refrigerate the 3rd pan until the others are finished and bake longer to compensate for the cold pan.
-
Grease 3 eight inch round cake pans, line bottoms of the pans with parchment paper circles, set aside.
-
Mix cake flour, sugar, baking powder, and salt in a large mixing bowl. Use the lowest speed on the mixer to blend the ingredients.
-
Whisk egg whites, milk, and extracts together, set aside.
-
With mixer running continuously on low speed, add softened butter 2 Tablespoons at a time. Continue mixing until the mixture is all moist crumbs. Stop the mixer, use a spatula to scrape the bowl, making sure there are no dry ingredients at the bottom of the bowl. Mix again to incorporate any remaining dry ingredients.
-
Pour all but 1/2 cup of egg white mixture into the butter mixture. Mix on medium high speed for 90 seconds. Turn off the mixer, add remaining 1/2 cup of egg white mixture, mix again on medium high for 30 more seconds. Turn off the mixer, scrape the sides and bottom of the mixing bowl. Mix again on high for 20 more seconds. No clumps of dry ingredients should remain.
-
Divide the batter evenly into prepared cake pans. Place the pans in the oven with at least 2 inches of space between pans and oven wall. Bake for 25 minutes, check for done. Cake is done when toothpick inserted into center comes out clean.
-
Remove cake pans from the oven, allow to cool 5 minutes, run a knife between the cake edge and the pan to loosen cake. Turn cakes out on a wire rack to cool completely if finishing the cake today or wrap cake layers in plastic wrap if finishing the cake at a later time.
Make the strawberry filling
-
Fill a coffee mug with 4 teaspoons of cold water, sprinkle the powdered gelatin over the top of the water. Allow to sit for few minutes until the gelatin blooms and the water is all absorbed.
-
In large mixer bowl add heavy whipping cream, powdered sugar, and vanilla. Begin mixing on low speed to combine ingredients. When cream starts to thicken, stop the mixer.
-
Microwave the bloomed gelatin for 15 seconds to liquify. Use while it is still hot.
-
Begin mixing the whipped cream on medium speed. Pour all of the hot gelatin into the cream in one quick motion while continuing to mix the cream.
-
Continue mixing the whipping cream on medium high until it is stiff and can hold its shape. Scrape the bowl as needed. Do not over mix.
-
Gently fold in the strained mashed strawberries. Refrigerate until ready to use.
Make the whipped mascarpone frosting
-
Fill a coffee mug with 8 teaspoons of cold water, sprinkle the powdered gelatin over the top of the water. Allow to sit for few minutes until the gelatin blooms and the water is all absorbed.
-
In large mixer bowl add heavy whipping cream, powdered sugar, and vanilla. Begin mixing on low speed to combine ingredients. When cream starts to thicken, stop the mixer.
-
Microwave the bloomed gelatin for 15 seconds to liquify. Use while it is still hot.
-
Begin mixing the whipped cream on medium speed. Pour all of the hot gelatin into the cream in one quick motion while continuing to mix the cream.
-
Turn the mixer speed to low. Add the mascarpone in heaping spoonfuls allowing each one to incorporate before adding the next. Continue until all mascarpone cheese is added.
-
Mix on medium high until the whipped cream is stiff and can hold a peak. Do not over mix. Refrigerate until ready to use.
Decorate the cake
-
Level each layer of the cake. Place the first one leveled side down on cake board or serving plate. Place 1/2 of the strawberry filling in the center of the layer and spread. Leave 1/2″ of cake showing all around the edge. Evenly distribute quartered, sliced strawberries throughout the cream filling for extra support between the layers.
-
Place the second cake layer on top of the filling, leveled side up, and give a very gentle downward push to attach the cake to the filling layer. Fill in the same way as the first layer.
-
Add the final layer of cake, leveled side down on top of the cake. Give a gentle downward wiggle to connect the cake to the layer of filling. Look at cake from all sides to make sure the layers are straight and the cake is level, gently push cake into place as needed.
-
Crumb coat the entire cake with a thin layer of whipped mascarpone frosting. Refrigerate for 30 minutes.
-
Finish frosting the cake with a thick layer of whipped mascarpone frosting. Cover the sides with graham cracker crumbs. Garnish with fresh strawberries and piped frosting.
-
Refrigerate until serving.
Recipe Notes
Cake is best on 1st and 2nd day after assembling. Eat within 7 days or freeze leftovers. White cake is adapted from Cook’s Illustrated White Layer Cake.
F.A.Q about Strawberry and Cream Cake
- Can I use cream cheese instead of mascarpone? Yes, you can, but the frosting will have a cheesecake type flavor and tanginess. The mascarpone is lighter in flavor and texture than cream cheese.
- Does the cake have to be refrigerated? YES!
- How long can the cake stay out at room temperature? A maximum time is 2 hours just to be safe.
- Do I have to use almond extract? No. You can use all vanilla if you’d like.
- Can I freeze the cake? Yes, as long as you keep the frozen cake stored in some sort of airtight container or plastic wrap, it will stay good for several months. I even individually wrap and freeze left over slices for quick casual desserts.
Any questions?
If you have any questions or if you try the recipe I’d love to know, send me an email! If you post a picture on your social media, please tag me so I can see your amazing cake!