Mexican chocolate hand pies from scratch… let’s let that sink it. Oh my WOW! I started out thinking I was going to make a copycat Chocolate Fudge Pop-Tart recipe, but instead, I made art. Mexican Chocolate art for your mouth. I’m so serious. Mine are heart-shaped hand pies, but you could shape them however you want.
This post contains affiliate links, I earn from purchases made from links in this post
Which Mexican Chocolate is the best for your hand pies?
Diving right into the controversy. I am an Ibarra Mexican Chocolate fanatic. There are those who are ABUELITA
fans, but we all know which chocolate company is an authentic Mexican company and worthy of being called “el mejor.”
(Ok, use whichever one you like, they will both make AMAZING Mexican Chocolate hand pie filling.)
It is essential that you use one or the other though. I am not vouching for your recipe if you try to sub it by making your own version. Stick with the plan, find some Mexican Chocolate!
Pie dough recipe for hand pies
I use my same pie crust recipe that I use for all pies. I find that it is sturdy and easy to roll and I love the taste. It’s an all-butter crust and I love that too. Here is a link to the BEST PIE CRUST RECIPE!
There is a wait time between making the pie crust and it being ready to roll, so be sure to plan at least two hours ahead if you are going to make your own pie dough.
If you aren’t ready to tackle the art of making pie crust, you can use a store-bought pie crust or a pie crust mix, either will do a great job.
What equipment and tools do I need to make Mexican Chocolate hand pies?
- Baking sheet
- Medium saucepan or pot
- Measuring cups and spoons
- Mixing bowls
- Whisk
- Silicone spatula or wooden spoon
- Rolling pin
- Heart shaped cookie cutter or a knife and straight edge (ruler)
- Pastry brush
What ingredients do I need to make Mexican chocolate hand pies?
- Pie dough
- Unsweetened cocoa powder
- Brown sugar
- Milk
- Mexican chocolate
- Semi-sweet chocolate (chips or chopped)
- Butter
- Vanilla
- Sugar
- Cinnamon
Tips for making the hand pies
Jump to RecipeWhenever you are taking on a creative baking project, it’s best to get prepared before you start.
Gather all of your ingredients and then decide what shape you are going to make your hand pies. I chose a heart because that’s just me, overstating the obvious love of pie.
Next, make the Mexican chocolate filling. It has to cool to room temperature before you use it or it will melt your pie crust and make shaping the pies very difficult! I poured my filling into a pie dish and then put it in the freezer for 10 minutes to cool it quickly.
While the filling is cooling begin rolling and cutting the pie crust. A regular batch of pie crust makes 8 -12 hand pies, but how many you get really depends on what size you make them. If you need more than 12, better make a double batch of pie crust!
Don’t forget you’ll need a top and a bottom cut out for each hand pie.
Tips for decorating and shaping hand pies
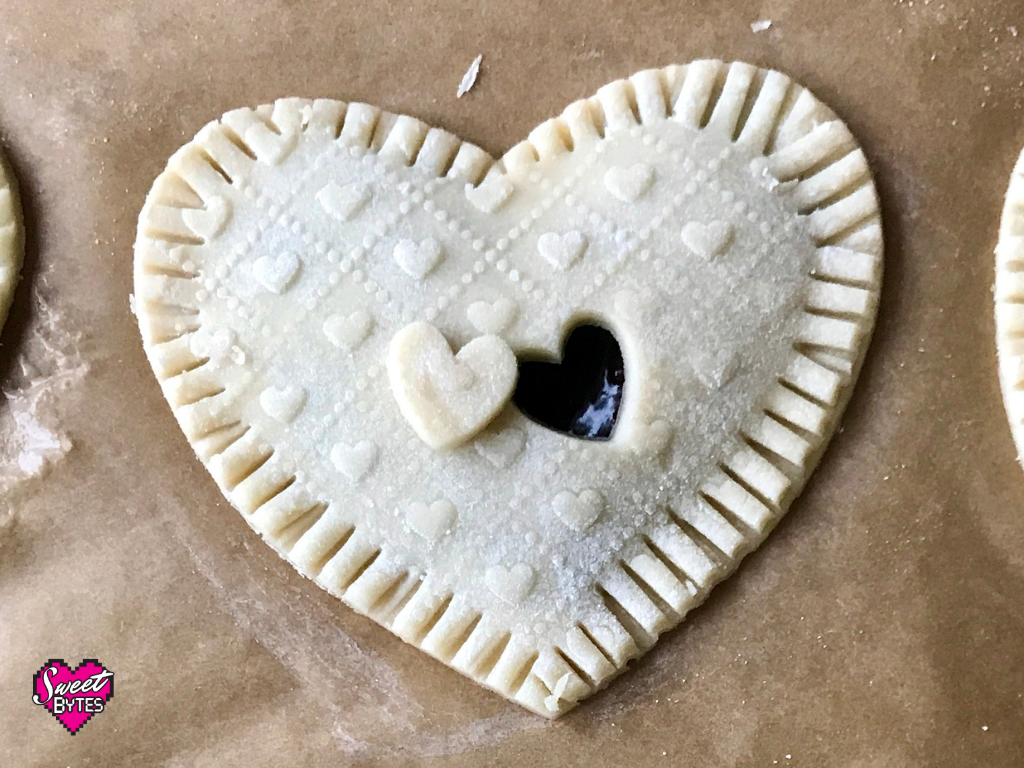
The easiest thing to do is to use a large cookie cutter and cut out the shapes that you would like to use as I did in the photo below.

I used a heart-shaped cookie cutter paired with a heart-shaped mini plunger to get the look. The tiny heart serves a dual purpose. It looks cute, but it’s also a vent to let the steam out so that the hand pie won’t have a blowout during baking.
It would also be fine to cut your own template out of paper and use a knife or just a knife alongside a ruler to make rectangles or squares. The most important thing is that the top and bottom are the same sizes.
In the first photo, the pies are embossed with a heart pattern. This was achieved by rolling over the heart cutouts with a laser engraved rolling pin. (My son bought it for me for Christmas- awww, such a perfect gift!) The nature of my all-butter pie crust didn’t hold the shape of the embossing after baking, but it looks great in the photos. Fondant and crisp cookies will hold the heart pattern for a finished product.
Before putting the filling on the crust, I brush each bottom crust with a thin layer of egg white. The proteins help to form a barrier between the crust and the filling and prevent any sogginess.
Be careful that you don’t overfill the pies. Leave 1/4″ of space all the way around the filling. Hand pies have a lot more pie crust than filling, which is an even better reason to have a delicious pie crust recipe! (The photo shows brown sugar cinnamon filling, but it will be the same amount and space no matter what type of filling you chose)
Finally, crimp and seal the edges of the hand pie. To do this well, moisten the exposed edges with egg white, lay the top crust over the filling, and use a fork or your fingers to crimp the edges.

After crimping the edges, I like to take the cookie-cutter and recut the shape. It makes the hand pie look nice and tidy and helps seal the edge even more.
Baking hand pies
Hand pies don’t take very long to bake. When the crust is golden brown they are done. The trick is, not to have the filling begin bubbling so violently that it explodes out of the pie before the crust is golden brown.
My best advice is to refrigerate the hand pies before you bake them so that they go into the oven cold. 30 minutes should be enough time in the refrigerator to chill them.
Also, a nice wash of egg yolk, mixed with a teaspoon of milk or cream helps the pies to brown nicely. You can also use just cream or just egg yolk. Each wash has a slightly different look when the pies are finished. (That’s information they’ve covered thoroughly over at The Kitchn )
For these, I chose the egg yolk with a teaspoon of cream and then sprinkled them with a cinnamon and sugar mixture.
Finally, I like to bake hand pies at 375°F in my convection oven. It takes about 20 minutes for the pies to be ready. They are ready when they are golden brown.
Side note: You really can’t overcook them unless you burn them. However, as I mentioned earlier, if the filling gets too bubbly it will boil out of the vent hole or even force the sides apart.

If you are using a conventional oven, it could take a few more minutes, but 20 minutes is a good standard. If you are a regular baker, you know that they’ll be done when they are done. The timer is an estimate and every oven has its own thing going on.
Recipe for Mexican Chocolate Hand Pies
Mexican Chocolate Hand Pies Recipe
Mexican chocolate hand pies are the perfect handheld dessert. Filled with the most delicious Mexican chocolate pie filling and a flaky buttery crust, you'll need one for each hand!
Ingredients
- 1 batch pie dough enough for a double-crust pie
Mexican Chocolate Hand Pie Filling
- 2 tablets Mexican chocolate Ibarra or Abuelita
- 1/3 cup packed brown sugar
- 1/4 cup unsweetened cocoa powder
- 2/3 cup milk
- 3 ounces semi-sweet chocolate chopped or chips
- 2 tablespoons butter
- 1 teaspoon vanilla extract
Assembling the pies
- 1 egg separated
- 2 tablespoons sugar optional
- 1 teaspoon cinnamon optional
Instructions
Make the Mexican Chocolate Filling
-
Whisk brown sugar, cocoa powder, and milk in a medium saucepan until sugar and cocoa powder and mostly incorporated
-
Heat mixture over medium heat, stirring constantly.
-
Add Mexican chocolate tablets to the mixture when it is hot, continue to stir constantly.
-
After the mixture begins to boil, continue boiling and stirring for 5 more minutes until all of the Mexican chocolate is melted and the mixture is thick and glossy.
-
Remove the cooked filling from the heat and add the semi-sweet chocolate, butter, and vanilla. Stir until the chocolate and butter are melted and incorporated.
-
Set the mixture aside to cool to room temperature before using. You can transfer it to a different container and set it in the freezer for 10 minutes to speed the process.
Assemble the Hand Pies
-
Roll your pie dough to 1/16" thickness
-
Cut pie dough into the desired shape. Use a 3 - 4" cookie cutter or a knife and straight edge. Make a top and bottom for each pie or a large shape that can be folded in half to enclose the filling.
-
Use a pastry brush to brush a thin layer of egg white over the bottom crust
-
Spoon the chocolate filling onto the bottom crust about 1/8" thick, careful not to overfill. Leave 1/4" of the crust exposed around the entire edge.
-
Gently place the top crust over the filling and use a fork or your fingers to seal the edges together. You will need to poke a few holes or cut a small shape out of the top crust to allow steam to escape during baking.
-
After the hand pie is assembled, brush the tops with your choice of crust wash. I like 1 egg yolk beaten with a teaspoon of milk.
-
Mix sugar and cinnamon together and sprinkle the tops of the hand pies.
Refrigerate
-
Refrigerate the assembled hand pies for 30 minutes before baking
Bake
-
Preheat the oven to 375°F
-
Bake the pies for approximately 20 minutes or until the desired level of golden brown is achieved.
Recipe Notes
These delicious little pies can be stored at room temperature for up to 3 days. They can be reheated in the toaster or by placing them back in the oven at 350°F for 10 minutes. They also freeze well.
Frequently asked questions about Mexican chocolate hand pies
What is Mexican Chocolate? It’s delicious but it’s not like a bar of chocolate you get from the candy aisle. Mexican chocolate is grainy and sugary chocolate made from cocoa paste, sugar, and cinnamon. Typically it is dissolved for drinking, but here we are using it for PIE!
Is there a substitute for Mexican chocolate? No. Sorry. All of the lies on the internet say to use chocolate and then a 1/2 teaspoon of cinnamon, but that is just a way to get a similar cinnamon/ chocolate flavor. The real deal is the real deal.
What is a hand pie? A hand pie is a pie that you can hold in your hand and bake without a pan. They have a high crust to filling ratio. Sometimes people call them toaster tarts, pop tarts, pie cookies, pie pops, or pocket pies.
Are these hand pies just homemade Pop-Tarts? Pop-tart is a registered trademark. They are mass-produced hand pies with creative fillings marketed as a breakfast pastry. These from-scratch hand pies are more like a gourmet pastry made individually with love. So if by “homemade pop-tart” you mean more delicious and better in all ways, yes.
Can you freeze hand pies? Yes, they freeze very well! Wrap it or place it in an airtight container. When you are ready to eat it, reheat it in an oven for 10 minutes at 350°F or you can use the toaster.
