International Day of Peace happens every year on September 21. It’s not just a day to flash peace signs and eat pie. Many organizations use Peace Day to work on peace treaties, negotiate for cease-fires, provide health care and social services, and work towards lasting world peace.
My favorite is Peace One Day. If you’ve never heard of it, go check it out! You will be inspired by all of the good that is happening throughout the world in the name of peace and may even be inspired to create some peace in your little corner of the globe!
This post contains affiliate links, I earn from qualifying purchases.
Peace Day Celebrations
Back in my art teacher days, I used to help with our Oklahoma City Community Peace Day Festival. My classes never missed a chance to participate in Pinwheels for Peace.

We had so much fun with music and community guests and our big handmade pinwheel installations. The template for making the pinwheels is on the Pinwheels for Peace site.
My Peace Day Pie
This year, I wanted to celebrate Peace Day in a way that was true to where I’m at in my life’s journey. Of course, I had to bake something. I was stuck between pie and cake, but I finally just went for pie!
Here’s a little step by step to my pie art process:
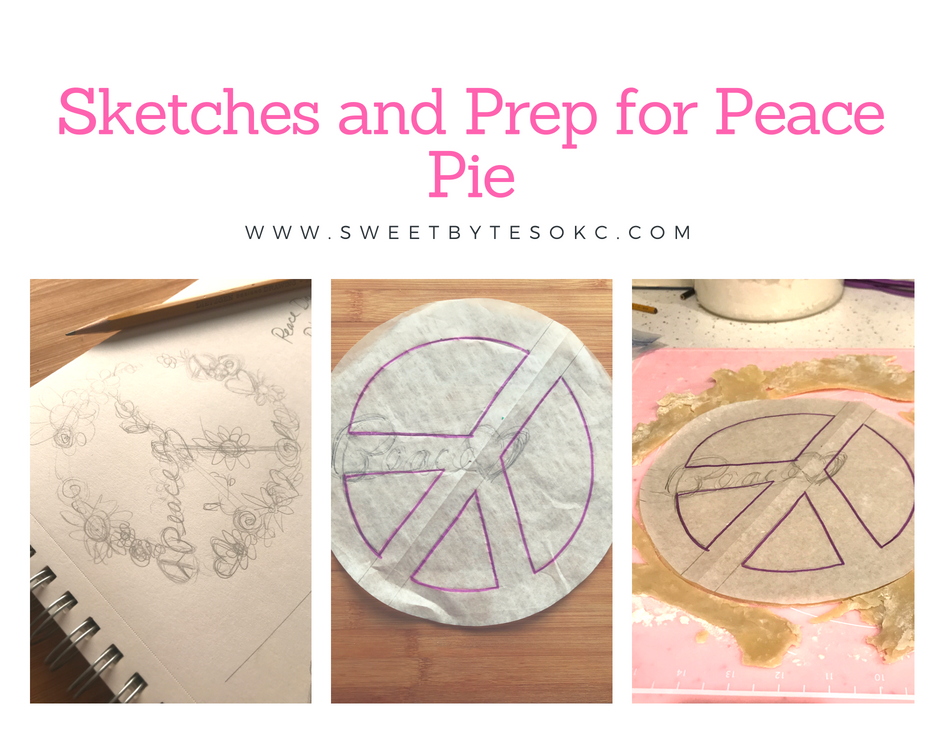
Sketching and prepping the design
- I started by sketching my ideas in my sketchbook.
- Next I got a 9″ parchment paper and drew my peace sign. (I have a ton of these lying around, but you could easily trace your pie plate on any paper.)
- Then, I rolled out my pie dough and used my Fat Daddio’s Knifetastic
to cut out the shape of the peace sign. That knife will not cut through my Silicone Baking Mat
and it is my pie crust BFF.
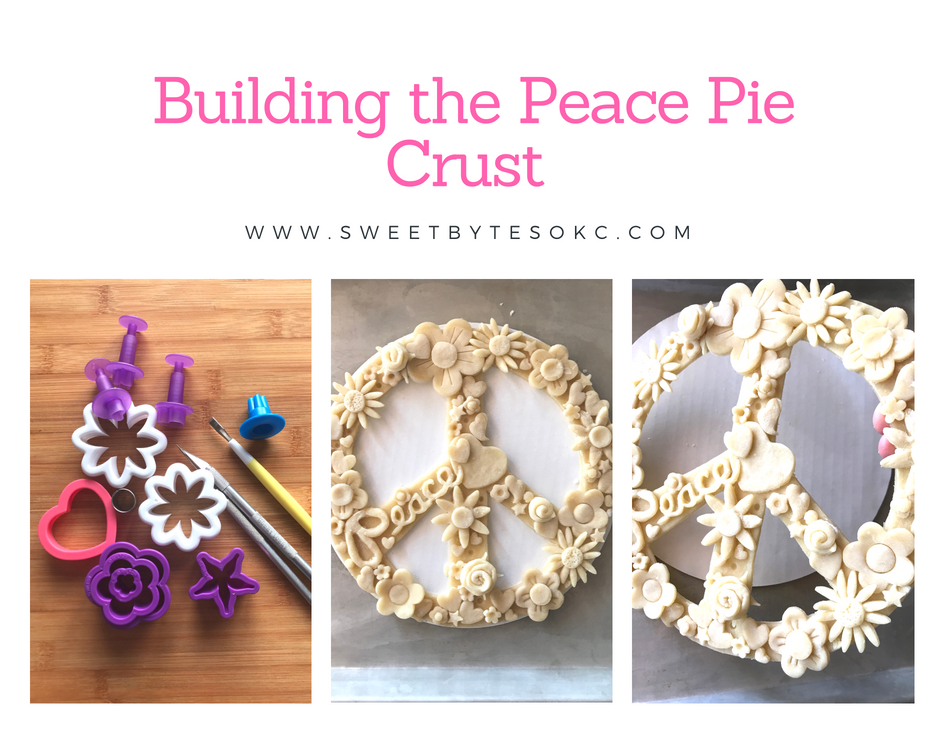
Creating the top crust
- I found an assortment of Wilton fondant cutters, fondant plungers, and cookie cutters. I also got out my Clay Needle Tool
, x-acto blade, and flat edged fondant tool that I don’t know what it’s called, but it was in my wilton gum paste modeling kit that has been discontinued. (Sorry.)
- After that, I assembled the entire top crust on a 9″ Round Cakeboard
using plain water and an artist style soft bristle paintbrush for “glue”
- Then I froze the crust for 20 minutes before laying it on top of the pie.
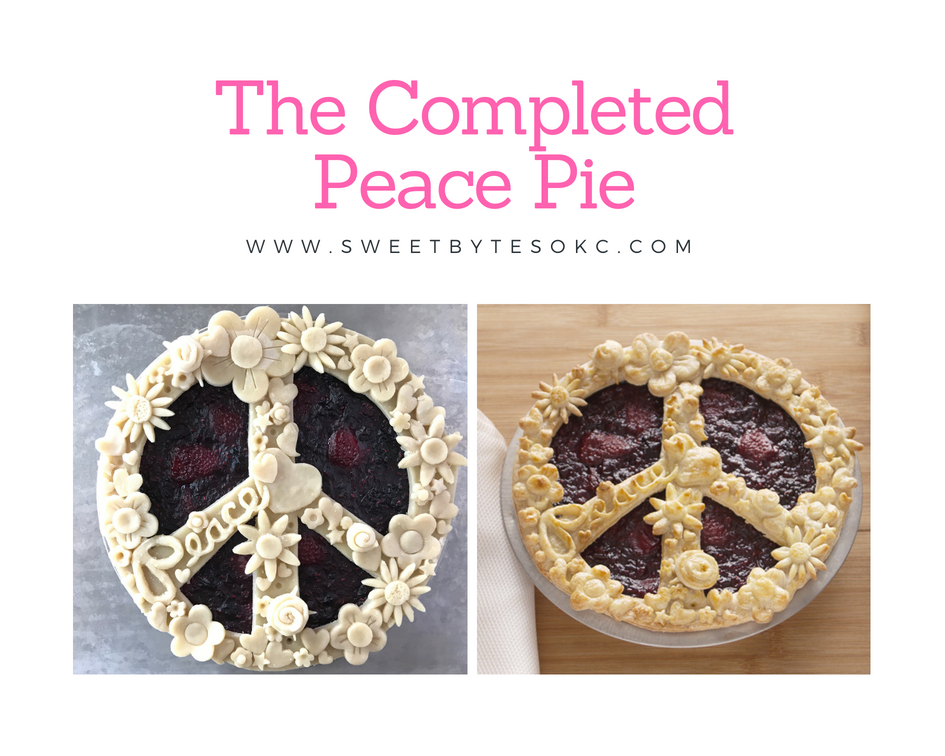
Baking the Peace Day Pie and the Final Results
- After removing the peace day pie crust from the freezer, I painted the entire surface with a mixture of egg yolk and cream. This creates a golden, slightly shiny surface on the crust.
- Then I decided that I was too afraid to bake the pie while assembled, so I cheated and baked them separately. At that point, I prayed. Thankfully the top crust was still frozen and it lifted off without any catastrophe. (Sometimes being a baker means being bold!)
- I baked the pie at 375°F for about 30 minutes (I bake until bubbling- never going far. I set the timer for 20 minutes then kept checking every 4 minutes. Sorry but I can’t be too sure of how long it really baked.)
- The top crust was baked separately on a cookie sheet with parchment underneath to prevent any sticking or breaking mishaps.
- I baked it on convect bake 400°F for approximately 15 minutes. (Until golden- stay close. Pie crust goes from undercooked to BURNT in about 1-2 minutes.)
- Using my handy dandy Wilton Cake Lifter, I lifted
the top crust onto the baked pie filling. Worked like a charm!
Do you need a great pie crust recipe?
The very best pie crust recipe I know of is the Flaky Pie Crust recipe that I use all the time. It only has 4 ingredients: Flour, butter, sugar, and water and it is amazing!!! Here’s a link to it: Truly the Best Pie Crust
Plus, here’s a top secret tip from me: If you are doing a lot of decorations or sculpting techniques using pie crust, letting your finished design sit overnight will allow the crust to firm up and the design to “set.” Then your details won’t be lost like they will be if you bake it right away. d
Questions or comments?
How did you celebrate Peace Day? It doesn’t have to be a huge thing. We can each bring peace to our own circles of influence and that will change the world. I would love to hear from you! Please drop me a line or comment below!